NTFS Bad Sectors Resolution: The $BadClus metafile
UPDATE (20-May-2012): This post is now out of date as there are numerous better and automated solutions available. The article is presented here for historical and academic interest.
UPDATE (16-Apr-2007): If you are using Windows Vista, there is a new option in chkdsk – chkdsk x: /b – which will re-evaluate all the bad sectors on your drive and remove non-faulty sectors from the list. Please use this instead of the methods below if you have access to Vista!
UPDATE (14-Apr-2007): An anonymous contributor has pointed out a simpler way to fix the $BadClus cloning issue using a tool called ntfsprogs, which also takes into account a wider variety of scenarios than the exercise below. Check out the steps at Linux NTFS Project’s ntfsclone Wiki page and try this method before spending time on the solution below. After you’ve followed the steps on the Wiki page, boot into Windows and type chkdsk x: /f at the command prompt (where x: is the drive to repair). If you’re interested in learning about NTFS for educational purposes, read on! 🙂
I’d like to talk a little about the internals of NTFS (the filesystem used by all NT-based versions of Windows), particular regarding the management of bad sectors.
First some jargon:
A sector is the smallest addressable unit of disk space on a hard disk. Almost all modern hard drives use a sector size of 512 bytes.
A cluster is the smallest addressable unit of disk space by the NTFS filesystem. A cluster is always an exact multiple of the sector size, and serves to simplify the addressing of data on drives. The default cluster size on drives larger than 2GB is 4k (4096 bytes or 8 sectors), however the user can change this when the drive is formatted in Windows using the Disk Management console. In general, however, most modern drives are formatted with 4k clusters.
NTFS maintains a number of invisible metadata files to enable certain features relating to recovery, security etc. One of these files – $BadClus – maintains a list of bad clusters on the drive. When NTFS detects a read or write error on a drive, it makes a note in $BadClus of the cluster number containing the failed sector, recovers the sector contents if the drive is fault-tolerant (eg. in a mirrored RAID configuration), stores the sector contents to an unused sector and creates fragmentation mapping in the file record of the file that the faulty sector is used by. In the simplest example, using a file that is originally contiguous (stored in all sequential clusters with no fragmentation), then if a file uses clusters 10-19 and a sector in cluster 14 is faulty, and the contents are rewritten to cluster 51, a mapping is created in the file record as follows: 10-13, 51, 15-19 – thereby turning a previously contiguous file into a file of 3 fragments.
When a bad cluster is found, NTFS also marks the cluster containing the faulty sector as in use in another metadata file – $Bitmap – which stores 1 bit indicating whether a cluster is free or used, for every cluster on the drive. $Bitmap is checked during file write operations to ensure that only free space is written to, therefore avoiding bad clusters (which are marked as in use). Ergo, the detection and remapping of file data in bad sectors is completely seamless and transparent to the user.
Now we come to the problem I had recently, and I write this article because I am sure this has happened to many people. I had a hard drive that was failing – some clusters had been marked as bad by NTFS – and I replaced it with a new drive. One can check to see if NTFS has marked bad clusters by running chkdsk on the drive in question (in Windows XP, chkdsk x: /i /c performs the least vigorous read-only check and therefore yields the fastest result). In the summary data displayed after chkdsk runs, one line reads “X KB in bad sectors”. Divide this figure by the cluster size of your drive (usually 4k as mentioned above) and you get the number of clusters marked as bad. In my case, chkdsk reported 8KB in bad sectors, therefore 2 bad clusters.
I formatted my new drive and imaged it with PowerQuest DriveImage 2002. Both DriveImage and PartitionMagic clone partitions onto other drives byte-for-byte – which means the bad cluster file $BadClus is also copied. This leads to a situation where clusters on your new drive are marked as bad when in fact they are not.
Usually this is not a problem and at worst leads to a few KB or MB of unusable space. However, since my new drive was not the same size as my old one – and I wanted a single partition that filled the whole drive – I also had to resize the partition after I imaged it. Unfortunately, PartitionMagic checks $BadClus prior to moving or resizing a partition and will refuse to perform the operation if any clusters are marked bad.
This led me to a Google search which revealed two facts:
- There is no software available for Windows to edit the bad cluster file
- The format of $BadClus is not documented
Therefore, to help other people avoid wasting 2 working days on this problem as I did, I present below the format of $BadClus, how to find it on your drive and how to remove the list of bad clusters.
IMPORTANT! The technique I describe below should not be used on drives known to be faulty, as it can cause previously remapped bad sectors (which really are bad) to become re-used by normal files again, and therefore lead to data loss if you do not have a fault-tolerant drive configuration.
Needless to say, you should only practice this technique if you are technically competent, as editing filesystem data directly on the disk is extremely dangerous and error prone, and a mistake can lead to great data loss, including the loss of the whole drive contents. I am not going to hold your hand too much here 🙂 (maybe just a little!)
You will need a disk sector editor. I use dskprobe.exe from Windows NT 4 Resource Kit which you can get from Microsoft’s web site. You could also try Runtime Disk Explorer for NTFS, it is a more user-friendly program but unlike DskProbe, not free.
First you need to navigate to the MFT – Master File Table – which is a table on an NTFS drive which indexes metadata and locations of all the files on your drive. Although the location of the MFT can be calculated with some cumbersome mathematics, using DskProbe or Disk Explorer it is fairly trivial to find: read sector 0 (the MBR – Master Boot Record – containing a list of partitions on your drive) – view in DskProbe as ‘Partition table’ from the menu, select your NTFS partition and click Go to be taken to the first sector of the partition, which is the NTFS Boot Sector. Choose view as ‘Boot Sector’ from the menu. Among the many figures shown is the offset to the first MFT record – click Go to be taken to this sector, and choose view as ‘Bytes’ from the menu.
One MFT record references one file. Everything on an NTFS filesystem is a file, including the MFT itself and all the metadata files. Each file is associated with a unique 0-indexed number (the MFT – $MFT – is file 0), and the metadata files have fixed numbers. $BadClus is file 8. One MFT record spans 1k (2 sectors). Therefore the record for $BadClus is in the 17th sector of the MFT (8*2 + 1). So use the Read Sector function in DskProbe, add 16 to the sector number you are currently at and when you read that sector, you should see among other things the word “$BadClus” (in Unicode – so it will appear like $.B.a.d.C.l.u.s.) somewhere in the sector data. If you see this, you’re in the right place.
(If you’re using Runtime DiskExplorer you have it easier – open your drive, double-click your NTFS partition, double-click “1st MFT cluster”, then double-click $BadClus. You’ll be taken straight to the $BadClus file record)
MFT records are composed of a 0x38-byte header starting at the beginning of the sector, followed by an arbitrary number of attribute-value pairs. Each attribute has a header containing the attribute number, attribute value length, non-resident flag (indicates whether the attribute value is defined in the MFT record itself or in a separate cluster or group of clusters), and various other flags. The attribute you’re interested in editing to fix up $BadClus is the last one – DATA (attribute 0x80). $BadClus actually has two DATA attributes, the first one is always empty and 0x18 bytes long. The second one contains a list of bad clusters.
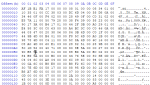
Here’s an example of what the MFT file record for $BadClus looks like on a drive with no errors. Yours will have different numbers in some places but the overall structure will be the same.

There are three pieces of data you need to edit:
- The bad cluster list
- The length of the attribute containing the bad cluster list
- The length of the MFT record
All data is stored little-endian, which means the least significant byte is stored first. Eg. cluster 0x124013 is stored hence: 13 40 12.
The organisation of cluster data in $BadClus is non-trivial. Most files on the system are stored in groups of clusters called “cluster runs”. A non-fragmented file consists of 1 cluster run. A file in 10 fragments is composed of 10 cluster runs (10 runs of contiguous clusters, in 10 separate areas of the disk). The cluster runs for any given file are stored in the MFT record in what is called a “run list”. The run list is stored in the DATA attribute of the record.
$BadClus works in a special way. NTFS supports a feature called sparse files. This feature works by truncating areas of all-zero-byte content in a file by not storing the zero-filled portions on the disk. For example if you have a file with 4096 (4k) bytes of non-zero data followed by 16384 (16k) bytes of zeroes followed by 8192 (8k) bytes of non-zero data, NTFS may create a sparse file; it will store the non-zero data on the disk but not the zero-filled data, thus the total file will occupy only 12k on the disk instead of 28k.
This feature is enabled by virtue of a feature called Logical Cluster Numbers and Virtual Cluster Numbers. Every file consists of a number of virtual clusters, the VCNs are always contiguous and are directly related to the actual size of the file (including any zero data). In the above example, we have a 28k file; the first VCN of a file is always zero; the file will occupy 28/4 = 7 clusters on a modern hard drive, so the file will span VCNs 0-6 inclusive. LCNs specify the actual location of data on the disk. Naturally, one real cluster can only store data for one file, so LCNs are unique to every file. If a file occupies 7 contiguous clusters at some arbitrary place on the disk, it may have LCNs 1287-1293. If it is in two fragments, it may be 1287-1289 and 5473-5476, for example. In both cases, the VCNs of the file will always be 0-6.
Sparse files are implemented by virtue of the fact that the number of LCNs a file consumes can be less than the number of VCNs. In our 28k file example, 12k of data will be stored on the disk (3 clusters) and 16k of zeroes will be truncated. The file occupies 7 virtual clusters, VCNs 0-6; but only 3 logical clusters on the drive itself, for example LCNs 1234-1235 and 6789. There is an implicit mapping inherent in the run lists stored in MFT records which maps VCNs to LCNs. If the OS requests data from a VCN that is not mapped to an LCN, a zero-filled cluster-sized blob of data is returned without accessing the disk, hence making sparse files transparent to the OS and all applications.
$BadClus is a very special sparse file. It spans the entire volume, that is to say, it “occupies” every cluster on the disk. However, the file is mostly all-zero. Only bad clusters are considered to have non-zero data in $BadClus, so the run list for $BadClus precisely maps to a list of all the bad clusters on the drive. Therefore, the list of bad clusters isn’t really a file – it’s just a run list in $BadClus’s MFT record, of clusters that will never be accessed.
To remove all the bad cluster mappings, we must therefore modify the run list so that there is a single VCN run which spans the whole volume, but which actually uses zero LCNs (no actual disk space; no clusters marked bad). That is to say, the entire ‘file’ must be made sparse (zero-filled).
I have so far not found documentation of the NTFS run list format on the web, so here it is:
- Byte 0: the high nibble indicates the number of bytes following which give the initial LCN. The low nibble indicates the number of bytes following which give the number of clusters in the run. Sparsity is accomplished by specifying a zero-length initial LCN with a positive length – thereby creating virtual file space which does not exist on the physical media.
- Bytes 1-x: The length of the cluster run.
- Bytes (x+1)-y: The initial LCN (if the first entry in the run list) or offset to next initial LCN from the previous one (if a subsequent entry in the run list)
Run list examples:
1. 31 04 9C 72 0D 00
Byte 0: Indicates 1 byte of length data and 3 bytes of initial LCN data to follow.
Byte 1: Length of the run is 4 (04) clusters [1 byte of length data]
Byte 2-4: Initial LCN is cluster 0D729C [3 bytes of initial LCN data]
Byte 5: Indicates 0 bytes of length data and 0 bytes of initial LCN data (end of list).
2. 31 04 9C 72 0D 22 24 12 05 40 00
The first 5 bytes (0-4) are the same as in example 1.
Byte 5: Indicates 2 bytes of length data and 2 bytes of initial LCN data to follow.
Byte 6-7: Length of the run is 0x1224 clusters [2 bytes of length data]
Byte 8-9: Initial LCN is cluster 0xDB2A1 [2 bytes of initial LCN data]. This is calculated by adding the actual offset stored in bytes 8-9 – 0x4005 – to the initial LCN of the previous run list entry – 0xD729C. 0xD729C + 0x4005 = 0xDB2A1.
Byte 10: Indicates 0 bytes of length data and 0 bytes of initial LCN data (end of list).
If the list was longer, subsequent entries would be calculated by keeping track of the cumulative addition of initial LCNs from previous run list entries, and adding it to the initial LCN of the following entry.
I have gone into great detail about this here, both for my own edification and because this is not clearly documented on the internet at all at the time of writing.
If you have Runtime Disk Explorer, the application will provide a breakdown of run lists in MFT records for you. However for our task, we need to know how to calculate our own.
Important locations:
- The length of the MFT record is stored in the MFT header; the length data is always stored at bytes 0x18-0x1B. In the image above, the MFT record length is 0x178. You will modify this value later after shrinking the bad cluster run list.
- The length of the $Bad DATA attribute containing the bad cluster run list. To find this you must first find the attribute itself. In my experience this is generally found at byte 0x120 in the sector (it always starts 80 00 00 00) but for safety it is best to calculate it. You will modify this value later after shrinking the bad cluster run list, to reflect the new length of the attribute. To find the location of the length of the attribute:
- Examine byte 0x14 of the MFT record. This tells you the offset from the start of the sector to the start of the attribute data. In the image above, the offset is 0x38.
- Examine each set of 8 bytes starting at the offset found above iteratively until you find the attribute you want. The start of each attribute contains two 4-byte numbers: the attribute ID and attribute length. At bytes 0x38-0x3F in the image above, we see attribute 0x10 (STANDARD_INFORMATION) with length 0x60. 0x60 + 0x38 = 0x98. At bytes 0x98-0x9F we see attribute 0x30 (FILENAME, also includes timestamp data etc.) with length 0x70. 0x70 + 0x98 = 0x108. At bytes 0x108-0x10F in the image above, we see attribute 0x80 (DATA) with length 0x18. This is the always-empty attribute peculiar to $BadClus I mentioned earlier, and should be skipped over too. 0x108 + 0x18 = 0x120. At bytes 0x120-0x127 in the image above, we see attribute 0x80 (DATA) with length 0x50. This is the attribute we want, and the length parameter is at byte 0x124 (4 bytes into the attribute header) – showing 50 00 00 00 in the image above.
- The run list itself. This is typically located 0x48 bytes into the attribute, right after the name ($Bad) which is stored in Unicode 0x40 bytes into the attribute. In the image above, the attribute starts at byte 0x120 so the run list starts at byte 0x120+0x48 = 0x168. The run list in the image is “04 58 0A 95 00”.
- The allocated size of the file. As mentioned, $BadClus is a sparse file spanning the whole volume, so the length of the file is the length of the volume in bytes. This is located 0x28-0x2F bytes into the $Bad DATA attribute, and in the image above reads “00 80 A5 50 09 00 00 00” (0x0950A58000 bytes).
One final note about attributes: they are always a multiple of 4 bytes in length, any slack at the end of an attribute (upto 3 bytes) is zero-padded, and the last attribute number is always FF FF FF FF. $Bad is the last attribute in the $BadClus MFT record, so we must be careful to place this end marker in the correct position after shrinking the run list.
Steps to remove all bad clusters from $BadClus:
- Run chkdsk x: /f to fix any filesystem errors on the drive apart from $BadClus. This step is important because you will run chkdsk again at the end to make sure you didn’t make any mistakes during editing.
- Use your sector editor to save a copy of the sector into a regular file before making any changes, in case you have to restore it later or make a mistake during editing. NEVER commit disk sector alterations unless you are very confident you have not made a mistake. If you think you have made an error, revert to the original sector and start again. Your drive can become instantly unreadable by Windows if you make an error.
- Calculate the number of clusters on the volume. Take the number of bytes specified in the allocated size of $BadClus and divide by the cluster size of your drive (typically 4k which is 4096 bytes); if you are not sure of your cluster size, use DskProbe or Disk Explorer to examine the NTFS boot sector – this contains the cluster size of the drive). $BadClus in the image above has 0x0950A58000 bytes / 0x1000 (4096) bytes per cluster = 0x0950A58 clusters.
- Remove the existing run list. Replace all the data from the start of the run list as found earlier, up to the FF FF FF FF end of attributes marker with zeroes.
- Write a new run list. The list contains a single entry with no initial LCN (0 bytes of initial LCN data, making the file sparse) and a length which is the number of clusters on the drive as just calculated. The run list for the drive in the image above would therefore be: 04 58 0A 95 00, and indeed if you examine the sector shown in the image, you will see that is exactly what it is. The 04 indicates 0 bytes of initial LCN data and 4 bytes of length data.
- Pad the run list to a four-byte boundary with zeroes then add FF FF FF FF 00 00 00 00 afterwards, eg. 04 58 0A 95 00 becomes 04 58 0A 95 00 00 00 00 FF FF FF FF 00 00 00 00.
- Subtract the location of the end of attributes marker you just wrote from the old location of the end of attributes marker. This value is the number of bytes you have shrunk the run list by, and therefore the number of bytes you have shrunk the $Bad DATA attribute by, and therefore the number of bytes you have shrunk the MFT record by.
- Subtract the value you just calculated from the length of the $Bad DATA attribute and rewrite the length of the attribute accordingly. You can double-check you have entered the correct figure by moving to the start of the attribute (80 00 00 00), adding the new length to the position in the sector, and you should land on the first byte of FF FF FF FF. In the image above, the $Bad DATA attribute starts at 0x120 with a length of 0x50; at 0x120+0x50 = 0x170, we correctly see the end of attributes marker FF FF FF FF.
- Subtract the value you just calculated from the length of the MFT record and rewrite the length of the record accordingly. You can double-check you have entered the correct figure easily; it should be the position of the first FF in the end of attributes marker, plus 8 bytes. In the image above, the end of attributes marker starts at byte 0x170, and the length of the MFT record (in bytes 0x18-0x1B) is 0x178.
- Commit your changes to disk.
- The $Bitmap metadata file will still indicate the bad clusters are in use. However you don’t need to fix this manually – chkdsk x: /f will do it for you. During its basic checks it compares all the run lists of all the files on the drive to the map of used clusters in $Bitmap; any clusters marked used in $Bitmap that are not actually used by any files (lost clusters) will he marked as unused. Chkdsk will report ‘CHKDSK has made corrections to the Volume bitmap’ or something similar when you do this. If you get any other errors during chkdsk, you have made a mistake while editing $BadClus. You may try running chkdsk in read-only mode first (without the /f flag) to find out. Chkdsk should also now report “0KB in bad sectors”, showing that the problem is resolved.
I hope you have found this article interesting and informative, and would appreciate any feedback you have to offer!
Leave a reply to steven chiang Cancel reply
Katy would love it if you could help keep her stocked with cookies while she codes!


Actually I interested in creating bad clusters. 🙂
Any software to do it?
Sorry, I write for error:
///////////////////
Way not make any person a program that check sectors not one by one – take any time, normally 8 to 10 hours – but 100 to 100 sectors, or 1000 to 1000 sectors, and when find a bad sector mark from the last good sector all bad, scanning 100 to 1000 sectors the time reduce many, and in almost all cases bad sectors are contiguous…
////////////////////
And is:
Way not make any person a program that check sectors not one by one – take any time, normally 8 to 10 hours – but 100 to 100 sectors, or 1000 to 1000 sectors, and when find a bad sector mark from the last good sector all bad, scanning 1000 to 1000 sectors the time reduce many, and in almost all cases bad sectors are contiguous…
Sorry…
First of all, Sorry for my not very good English…
Well Katy, I have a doubt about bad sectors, and is:
Way not make any person a program that check sectors not one by one – take any time, normally 8 to 10 hours – but 100 to 100 sectors, or 1000 to 1000 sectors, and when find a bad sector mark from the last good sector all bad, scanning 100 to 1000 sectors the time reduce many, and in almost all cases bad sectors are contiguous…
With this option of scan disk sectors 1000 by 1000 in 1 minute are checked almost all of the disk, and marking inmediately how bad the last 1000 sectors, yes, many sectors good are marked bad, but not lost many of the space of the disk, but the advantage of this method are that in 5 mnutes any person recover a hard disk with all bad sectors marked – with many of good sectors, but not lost many of the space -…
Is possible a programa how this???
For example, HDD Regenarator, take 8-10 hours in terminate scan, and HDD Regenarator attempt to recover bad sectors, but well, not is more better have the option – if any only want to recover the disk, not the disk information – check 1000 by 1000 sector, and not attempt to recover bad sector, when a sector are bad, mark inmediately the last 1000 sectors as bad, and continue, and in little little little time, HARD DISK recovered for use!!!
Is possible make a programa how this???
Thanks in advance Katy if you answer…
Have you a nice day…
Javier…
Thank you for the detailed information! This is the first good explanation I ever read on how NTFS works. And I am here only because one pesky sector clones to every new disk I go through.
To Steven Chiang question: Use, for example,
chkdsk /b
see https://technet.microsoft.com/en-us/library/cc730714.aspx
“/b
NTFS only: Clears the list of bad clusters on the volume and rescans all allocated and free clusters for errors. /b includes the functionality of /r. Use this parameter after imaging a volume to a new hard disk drive.”
can you point me to the utilities referenced in “This post is now out of date as there are numerous better and automated solutions available. The article is presented here for historical and academic interest.”?