IL2CPP Reverse Engineering Part 1: Hello World and the IL2CPP Toolchain
[You can use Il2CppInspector to help automate the techniques outlined in this series]
[Updated 27th November 2020: the command-line build instructions were updated to be compatible with Il2CppInspector 2020.2.1]
In this article, you will learn:
- what IL2CPP is and why it exists
- what the generated C++ source code and binary disassembly of a simple function looks like compared to native C#, IL and C++ code
- how to setup your environment to generate C++ source code and IL2CPP binaries from your own C# code so that you can examine and compare them with your original code
- how to use IL2CPP at the command-line on arbitrary code without Unity
Introduction to IL2CPP
IL2CPP is an alternative application deployment model introduced into Unity in 2015 which is designed to bring significant performance improvements to Unity games. It’s a beautiful mess, and today we’re going to start picking it apart.
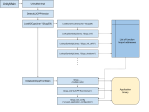
A standard Unity game is distributed as a series of .NET assemblies which are executed by the managed runtime (CLR) on the target platform of choice as per the norm for any .NET application. The premise of IL2CPP is to take these assemblies, parse the IL, generate C++ equivalent source code from it, then compile this C++ into machine code for faster, unmanaged execution. This is described quite well on this page of the Unity manual with this diagram:

There are several excellent guides about how IL2CPP generates code such as Unity’s own IL2CPP Internals blog series and Jackson Dunstan’s exquisitely detailed musings, so I’m not going to repeat that work here. Instead, I want to focus on the opposite perspective: how do we reverse engineer compiled IL2CPP binaries?
Unity games have traditionally been exceptionally easy to reverse engineer, generally requiring nothing more than a copy of ILSpy (or my preferred tool Telerik JustDecompile) and a dream. IL2CPP changes all that: we go from neat assemblies – often with all of the function and variable names intact – to straight up machine code that we have to wade through in a disassembler. Suddenly, even finding the areas of interest becomes magnitudes tougher. How can we make this task easier?
To answer that question, we’re going to need to develop a deep understanding of how IL2CPP manages types and data under the hood, and that’s what this series is all about. Buckle up!
Tracing a Path: Six Representations of Hello World
Consider the following trivial program:
using System;

namespace HelloWorld
{
    class Program
    {
        static void Main(string[] args) {
            var a = 1;
            var b = 2;
            Console.WriteLine("Hello World: {0}", a + b);
        }
    }
}
How does IL2CPP convert this to C++? In your mind’s eye, you might imagine the method gets translated something like this (foregoing the fact we’d likely use iostream and cout in real code):
#include <stdio.h>

int main(int argc, char **argv) {
    int a = 1;
    int b = 2;
    printf("Hello world: %d\r\n", a + b);
}
In fact, Main gets translated like this:
// System.Void HelloWorld.Program::Main(System.String[])
IL2CPP_EXTERN_C IL2CPP_METHOD_ATTR void Program_Main_m7A2CC8035362C204637A882EDBDD0999B3D31776 (StringU5BU5D_t933FB07893230EA91C40FF900D5400665E87B14E* ___args0, const RuntimeMethod* method)
{
	static bool s_Il2CppMethodInitialized;
	if (!s_Il2CppMethodInitialized)
	{
		il2cpp_codegen_initialize_method (Program_Main_m7A2CC8035362C204637A882EDBDD0999B3D31776_MetadataUsageId);
		s_Il2CppMethodInitialized = true;
	}
	int32_t V_0 = 0;
	int32_t V_1 = 0;
	{
		V_0 = 2;
		int32_t L_0 = V_0;
		V_1 = ((int32_t)il2cpp_codegen_add((int32_t)1, (int32_t)L_0));
		int32_t L_1 = V_1;
		int32_t L_2 = L_1;
		RuntimeObject * L_3 = Box(Int32_t585191389E07734F19F3156FF88FB3EF4800D102_il2cpp_TypeInfo_var, &L_2);
		IL2CPP_RUNTIME_CLASS_INIT(Console_t5C8E87BA271B0DECA837A3BF9093AC3560DB3D5D_il2cpp_TypeInfo_var);
		Console_WriteLine_m22F0C6199F705AB340B551EA46D3DB63EE4C6C56(_stringLiteral331919585E3D6FC59F6389F88AE91D15E4D22DD4, L_3, /*hidden argument*/NULL);
		return;
	}
}
Woah! That’s a lot of gunk. What is going on here?
First, remember that IL2CPP starts with the IL code of an assembly as its input – not the C# source code. If we look at the IL of our trivial C# code, we get:
ldc.i4.1
stloc.0
ldc.i4.2
stloc.1
ldstr "Hello World: {0}"
ldloc.0
ldloc.1
add
box System.Int32
call System.Void System.Console::WriteLine(System.String,System.Object)
ret
This code corresponds to the second braced block in our generated C++. IL is a stack-based pseudo-assembly language; IL2CPP will perform a linear scan over the IL bytecode and translate it into non-stack-based equivalents in C++. This is why we see some redundant variables and assignments in the C++ code, which will hopefully be optimized away by the compiler to some extent. This also explains why we see a boxing operation.
The call to il2cpp_codegen_add handles any operator overloading of + in the expression a + b. IL2CPP_RUNTIME_CLASS_INIT ensures that a class (Console in this case) has executed its static constructor before being used, for example in Console.WriteLine. At the top of the function, we find a boolean check which IL2CPP generates for every static method, again used to ensure that the proper initialization is done before execution proceeds.
So, why does any of this matter?
Obviously if you are reverse-engineering a game, you won’t have the Unity project so you won’t be able to look at the generated C++. But it’s important to remember that even if by some dark magic you achieve a perfect decompilation of the target binary into C++, what you will end up with is very different to the original C# source code. Whereas our idealized C++ version using printf disassembles like this on x64:
; int __cdecl main(int argc, const char **argv, const char **envp)
main proc near
sub     rsp, 28h
mov     edx, 3
lea     rcx, _Format    ; "Hello world: %d\n"
call    printf
xor     eax, eax
add     rsp, 28h
retn
main endp
The IL2CPP version, on the other hand, looks like this:
; void __fastcall Program_Main_m2325437134(Il2CppObject *__this, StringU5BU5D_t1642385972 *___args0, MethodInfo *method)
Program_Main_m2325437134 proc near
push    rbx
sub     rsp, 20h
cmp     cs:s_Il2CppMethodInitialized_8016, 0
jnz     short loc_14038BFF1
mov     ecx, cs:?Program_Main_m2325437134_MetadataUsageId@@3IB
call    ?InitializeMethodMetadata@MetadataCache@vm@il2cpp@@SAXI@Z
mov     cs:s_Il2CppMethodInitialized_8016, 1
loc_14038BFF1:
mov     rcx, cs:?Int32_t2071877448_il2cpp_TypeInfo_var@@3PEAUIl2CppClass@@EA
lea     rdx, [rsp+48h]
mov     dword ptr [rsp+48h], 3
call    ?Box@Object@vm@il2cpp@@SAPEAUIl2CppObject@@PEAUIl2CppClass@@PEAX@Z
mov     rcx, cs:?Console_t2311202731_il2cpp_TypeInfo_var@@3PEAUIl2CppClass@@EA
mov     rbx, rax
test    byte ptr [rcx+10Ah], 1
jz      short loc_14038C02B
cmp     dword ptr [rcx+0BCh], 0
jnz     short loc_14038C02B
call    ?ClassInit@Runtime@vm@il2cpp@@SAXPEAUIl2CppClass@@@Z
loc_14038C02B:
mov     rdx, cs:?_stringLiteral3443654334@@3PEAUString_t2029220233@@EA
xor     r9d, r9d
mov     r8, rbx
xor     ecx, ecx
call    Console_WriteLine_m3776981455
add     rsp, 20h
pop     rbx
retn
Program_Main_m2325437134 endp
– and that disassembly is with the symbols included, which you initially won’t have.
Therefore, in order to be able to understand the disassembly of a method in an IL2CPP application, we really have to understand all of the key data structures and internal API calls that IL2CPP provides and manages, so we can cut through all of the boilerplate and drill down into the actual functionality of the application.
To this end, it can be very useful to compile small snippets of C# with IL2CPP and investigate what comes out (cryptographers will recognize this as a sort of known plaintext attack).
Using IL2CPP to generate code
There are two main ways to do this:
- Create an empty Unity project, set the scripting backend to IL2CPP, add one or more desired source files (or
MonoBehaviours), and build the project. - Skip Unity and use
il2cpp.exedirectly from the command-line.
Il2CppInspector also provides a streamlined way of generating code, described below.
Using Unity to generate code with IL2CPP
The first option is more straightforward but slower, and will always include many unneeded Unity assemblies, but has the advantage that you don’t need to worry about configuring all the dependencies for your environment and target architecture. When you build a Unity project with IL2CPP, the location of the generated C++ can vary (depending on which version of Unity you use) but is usually in a folder called il2cppOutput located somewhere in the project’s build output.
To do this:
- Create a new project in Unity Hub

2. In File -> Build Settings, select either PC, Mac & Linux Standalone, Universal Windows Platform, iOS or Android.
3. Click Player Settings… and in Player -> Other Settings -> Configuration, change the Scripting Backend to IL2CPP. Ensure that the C++ Compiler Configuration is set to Release.

4. Drag the source files you want to use into the Assets folder under the Project tab of the Unity main editor window.
5. In File -> Build Settings, click Build and choose a target folder for the build. This will take a while.
Notable output files:
The Mono build (regular .NET assembly): Test_BackUpThisFolder_ButDontShipItWithYourGame\Managed\Assembly-CSharp.dll.
The C++ source code generated by IL2CPP: Test_BackUpThisFolder_ButDontShipItWithYourGame\il2cppOutput.
The native binary compiled from C++: GameAssembly.dll
The metadata generated by IL2CPP (we’ll return to this later): Test_Data\il2cpp_data\Metadata\global-metadata.dat.
(this is correct for Unity 2019.3.1f1 – file locations may vary with different versions of Unity)
Using IL2CPP on the command-line
The second option is more interesting: IL2CPP does not actually require Unity at all. It can work as a completely standalone tool, which also means it can produce things like executable binaries for regular .NET console applications that don’t have any connection with Unity. This is the technique I used to create the Hello World example above.
My preferred technique is to place the IL2CPP toolchain and all of its dependencies into their own folder. The folders you need are all in the Editor\Data folder of Unity and they are:il2cppMono or MonoBleedingEdge (depending on version; new versions of Unity use the latter)PlaybackEngines\AndroidPlayer (if building for Android)PlaybackEngines\windowsstandalonesupport (if building for Win32; not needed for UWP)
If you are building for Android, you will also need to download the Android NDK, which you can place in a sibling folder.
Copy these folders into a folder of your choice – maintaining the directory structure. This is your IL2CPP toolchain. Go ahead and compile a C# file (for example, the Hello World example above) in Visual Studio or with the Roslyn compiler csc.exe, so that you have a test assembly to work with.
The actual work is done by il2cpp.exe which can be found in il2cpp\build, il2cppbuild\deploy\net471 or similar depending on your Unity version.
Important: il2cpp.exe takes many arguments and some of them vary from version to version. Crucially, this wide variety of options can have a significant impact on the generated code, which means the disassembly of games you are reverse engineering may vary drastically depending on which options the developers used. You can experiment by building IL2CPP projects as described above in different versions of Unity and using a process snooping tool such as the excellent Process Hacker 2 to ascertain the command-line arguments used to il2cpp.exe during the build.
Some of the most important options are:
--convert-to-cppconverts the input assemblies to C++--compile-cppcompiles the C++ to executable machine code--libil2cpp-staticbundles libil2cpp in with the executable. You should always specify this option as it is how software is shipped--platformis the target build platform, eg.WindowsDesktop,Androidetc.--architectureis the target architecture, eg.x86,x64,ARMv7--configurationis the build configuration to use. Normally you will want to useReleaseto produce code most similar to that shipped with games--dotnetprofile="unityaot"sets the .NET profile (later versions of IL2CPP require this to avoid errors)--forcerebuildwill force the C++ to be re-generated even if it already exists--assemblyis a comma-separated list of assemblies to compile
OR--directoryis a comma-separated list of directories containing assemblies to compile--outputpathspecifies where to save the compiled executable binary--generatedcppdirspecifies where to save the generated C++ code--verboseenables verbose output
When building for Android, also include:
--additional-include-directories=<path to your AndroidPlayer folder>/Tools/bdwgc/include--additional-include-directories=<path to your AndroidPlayer folder>/Tools/libil2cpp/include--tool-chain-path=<path to the android NDK>
If you chose to let Unity download the Android NDK for you, it will be located in AndroidPlayer\NDK.
Note: IL2CPP in Unity 2017 onwards does not automatically find mscorlib.dll and requires you to supply it explicitly; specifically, the version found at Editor\Data\MonoBleedingEdge\lib\mono\unityaot\mscorlib.dll. You should place this in the same folder as your test assemblies so that IL2CPP can find it. If you try to use any other version of mscorlib.dll, you will get a fatal error when running il2cpp.exe.
Example usages
Here is what a minimal build command for our Hello World example would look like:
il2cpp.exe ^
  --assembly=HelloWorld.exe ^
  --outputpath=HelloIl2Cpp.exe ^
  --libil2cpp-static ^
  --convert-to-cpp ^
  --compile-cpp ^
  --generatedcppdir=Cpp ^
  --verbose
To build an executable binary for a Windows 32-bit standalone application with a similar composition to Unity’s default settings for shipping games (replace x86 with x64 for 64-bit):
il2cpp.exe ^
  --convert-to-cpp ^
  --emit-null-checks ^
  --enable-array-bounds-check ^
  --dotnetprofile="unityaot" ^
  --compile-cpp ^
  --libil2cpp-static ^
  --platform="WindowsDesktop" ^
  --architecture="x86" ^
  --configuration="Release" ^
  --outputpath=Output ^
  --map-file-parser="il2cpp\MapFileParser\MapFileParser.exe" ^
  --directory=InputAssemblies ^
  --generatedcppdir=Cpp ^
  --verbose ^
To build an executable binary for Android with a similar composition to Unity’s default settings for shipping games (replace ARMv7 with ARM64 for 64-bit):
il2cpp.exe ^
  --convert-to-cpp ^
  --emit-null-checks ^
  --enable-array-bounds-check ^
  --dotnetprofile="unityaot" ^
  --compile-cpp ^
  --libil2cpp-static ^
  --platform="Android" ^
  --architecture="ARMv7" ^
  --configuration="Release" ^
  --outputpath=Output ^
  --additional-include-directories="PlaybackEngines/AndroidPlayer/Tools\bdwgc/include" ^
  --additional-include-directories="PlaybackEngines/AndroidPlayer/Tools\libil2cpp/include" ^
  --tool-chain-path="PlaybackEngines/AndroidPlayer/NDK" ^
  --map-file-parser="il2cpp\MapFileParser\MapFileParser.exe" ^
  --directory=InputAssemblies ^
  --generatedcppdir=Cpp ^
  --verbose ^
Note: From Unity 2019 onwards you can only create a DLL with il2cpp.exe. Attempting to create an EXE will fail.
Using Il2CppInspector to generate IL2CPP code
If this sounds like a lot of hassle, don’t worry! There is an easier way.
While Il2CppInpsector is primarily designed to assist with reverse engineering, it also includes a simple-to-use tool that will allow you to easily create IL2CPP binaries and C++ source code from any C# source.
The secret sauce is the il2cpp.ps1 PowerShell script in the Il2CppTests project. In this project, you will find a few key folders:
TestSources– place your test.csfiles here. Each one will be treated as a separate assemblyTestAssemblies– the .NET assemblies compiled from the files inTestSourceswill be placed hereTestCpp– the C++ source code generated by IL2CPP for each assembly and architecture will be placed hereTestBinaries– the IL2CPP executable binaries for each assembly and architecture will be placed here
Simply install Unity, place your C# source file(s) into TestSources and – with Il2CppTests as the working directory – type the following command at the Powershell prompt:
./il2cpp.ps1 MyTest
Here we assume we have created a file called TestSources\MyTest.cs.
Il2CppInspector will:
- look for your Unity,
csc.exe(C# compiler), IL2CPP and Android NDK installs - compile every specified C# source file in
TestSourcesto a separate assembly inTestAssemblies(use a comma-separated list and don’t specify the.csextension; if you don’t specify any files, every file will be compiled to its own assembly) - run IL2CPP on each assembly in
TestAssembliesspecified in the command-line argument for a variety of target platforms and architectures, placing the results inTestCppandTestBinaries.
If you have multiple Unity installations, you can supply a 2nd argument to specify which version to use, eg. 2019.3.1f1 or 2019.4.15. You can use a wildcard to select the latest installed version, eg. 2020.1* will use the latest installed version of Unity 2020.1.x; if you don’t specify any version, the latest installed version will be used. If your Unity install is not in the default path, you can instead specify the exact pathname. This also accepts wildcards in the same way to select between multiple versions.
In this way, you can make changes to your C# source, type one short command and have the .NET assembly, C++ source and IL2CPP binaries for several platforms and architectures regenerated for you automatically, which should make your workflow smoother.
ARMed and ready
Hopefully you now have a rudimentary understanding of how IL2CPP processes .NET assemblies, why the final binaries are so much more convoluted than you might first imagine, and be able to navigate your way around the basics of the IL2CPP toolchain and generate C++ and IL2CPP binaries from the C# code of your choice.
In the next part of this series, we’ll dive into the libil2cpp source code and examine some of the fundamental structures and metadata that every IL2CPP application needs, and which serves as our starting point for reverse engineering all IL2CPP binaries.
Share your thoughts! Note: to post source code, enclose it in [code lang=...] [/code] tags. Valid values for 'lang' are cpp, csharp, xml, javascript, php etc. To post compiler errors or other text that is best read monospaced, use 'text' as the value for lang.
Katy would love it if you could help keep her stocked with cookies while she codes!


I believe this post’s information is out of date for Android builds. il2cpp.exe no longer appears to be called during the build of an Android il2cpp project in the latest version of Unity.
Hi Katty. You made titanic work, thank you. Starting to dive in to reverse engineering from this articles (want to extract some data from apk file).
I have problem with running test. I can’t understand, what I’m doing wrong.
looks, like script don’t include default libraries?
Runned your script with powershell
I will be grateful case you’ll have some minutes to check this
i’m encountering this error when trying to il2cpp-compile the HelloWorld sample:
il2cpp.exe didn't catch exception: System.IO.DirectoryNotFoundException: Could not find a part of the path 'toolchain\il2cpp\Libil2cppLackey'.seen your reply on Unity forum :+1:
Great stuff Katy! I’ve read both your IL2CPP posts and look forward to seeing more. New to IL2CPP and this was great. The guy’s over on BepInEx and Doorstop have been hard at work with the new BepInex v6.0 preview, which is good to see how to inject Mono into a IL2CPP game, but it’s just doesn’t seem to work for me. Using Inspector worked the first time around!!! Thanx.
Glad it was helpful! I’m many weeks behind where I wanted to be due to real life but there are more tutorials coming “real soon now” (heh) I promise 🙂
Hi I have a problem and I am looking for a solution I have tried Dumpe il2cpp but I am surprised that it is encrypted Can you please tell me how can I bypass il2cpp encrypt pleeeeease