Tutorial: Enabling Re-definable Controls in Windows games
In this article we shall take a look at how to make the controls in your C++ game editable by the user. Once again we shall use SimpleTetris as the base example, and as with our implementation of the high score table, we will make use of Boost for serializing (saving) data into a file, and my Simple2D library for rendering the interface (although this part is optional).
Download: Source code (.cpp) | Source code (.h) | Executable
Outline
Adding the ability to redefine the controls in a game is a common and expected feature in PC games. The task can be broken down into three main areas:
- Store a list of which keys/buttons do what in a file, and load this into an in-memory array/list when the game starts. This stage provides persistence, so that if the controls are changed, the changes are saved for next time the game is played.
- Replace hard-wired references to specific key/button checks in your game code with references to corresponding items in the loaded key list. This stage provides the functionality of allowing any customized controls to actually work.
- Provide a user interface which allows the user to edit the key list and save any changes made. This stage provides the ability to change the controls from their default settings.
1. Processing keyboard input (without DirectX)
Virtual Key codes, Windows key events and AsyncGetKeyState
When the Windows message pump in your application receives a key event such as WM_KEYDOWN (key has been pressed), the WPARAM supplied with this is the so-called Windows Virtual Key code of the pressed key. Virtual key codes provide a handy way to represent each particular key with a universal number that remains the same regardless of keyboard manufacturer, territory, input language etc. No matter what type of keyboard you are using or where, the left arrow key (for example) will always have the same numerical equivalent value as a virtual key code. The Windows API defines an enum which gives the key codes friendly names so that you don’t actually have to remember all these numbers, so for example, the left arrow key always maps to VK_LEFT.
Generally speaking, when you are offering the user control of the game via Windows key press events, you will have code that looks roughly like this:
// Handle Windows message pump
LRESULT CALLBACK WndProc(HWND hwnd, UINT message, WPARAM wParam, LPARAM lParam)
{
    switch (message) {
    ...
        // Code for dealing with window creation, resizing, focus changes, mouse movement etc.
    ...
        // Virtual key has been pressed
        case WM_KEYDOWN:
          yourApplicationObject->OnKeyDown(static_cast<int>(wParam), LOWORD(lParam), static_cast<bool>((lParam >> 30) & 1)));
          break;

        // Virtual key has been released (not always needed, largely dependent on your application)
        case WM_KEYUP:
          yourApplicationObject->OnKeyUp(static_cast<int>(wParam), LOWORD(lParam));
          break;
    ...
    }
    ...
}
...
// Handle key presses in my game object
YourApplicationClass::OnKeyDown(int key, int repeatCount, bool previousState)
{
    if (key == VK_LEFT) ... // move left (left arrow pressed)
    if (key == VK_RIGHT) ... // move right (right arrow pressed)
    if (key == VK_SHIFT) ... // fire gun (SHIFT key pressed)
    ...
}
wParam contains the virtual key code of the pressed (or released key), the low word of lParam contains the repeat count, ie. how many times the key press has repeated with the current user’s keyboard settings (in Control Panel), and bit 30 of lParam in a WM_KEYDOWN event indicates whether the key was previously down before this event or not. This is handy as a test to help prevent duplicate processing of keys in certain situations, although it doesn’t apply here.
Allowing key presses to come in to your application according to the user’s keyboard repeat timing settings is fine for games like Tetris, but in an action game we want to ignore the repeat timing settings and get instantaneous “is the key up or down now?”-type information. Hence the alternative way to allow the user to control the game is to use GetAsyncKeyState, which returns true if the key corresponding to the virtual key code specified as the argument is currently pressed, ie.:
if (GetAsyncKeyState(VK_LEFT))
   ... // move player left
This kind of checking would normally be performed in the game world object update stage of your game, each frame, prior to rendering the scene.
Scan codes
A scan code is a number representing a specific key on a specific keyboard. Different manufacturers are free to use their own scan codes, and keyboards designed for countries with non-English character sets will generate scan codes not generated by pure English keyboards, for example. Windows deals with the conversion of these internal hardware scan codes into virtual key codes for you, but there are a few reasons to be aware of them:
1. Not all virtual key codes can distinguish between the left and right versions of keys such as SHIFT, ALT and CTRL, ie. not all virtual key codes are always unique to a single key, whereas a scan code is and can be used to determine precisely which key has been pressed if it is important to distinguish between them. There are virtual key codes which distinguish between left and right versions of keys, however the Windows message loop returns the non-deterministic version of the virtual key code.
2. If we want to store a file with a list of redefined controls in the user’s roaming profile data, we need to store the control list as virtual key codes, not scan codes. This is because scan codes are not portable between computers. Additionally, when the game is shipped, it will have a default set of controls, yet you have no way in advance of knowing what kind of hardware your game will be played on, so you need to use a portable solution, which means using virtual key codes.
3. In our Redefine Controls user interface, we will need to display the names of the keys being edited. The Windows API function GetKeyNameText accepts lParam from an event such as WM_KEYDOWN (which contains the scan code in the high word plus some other assorted single bits of information) and converts it into a human-readable key name such as ‘SHIFT’. Unfortunately, these values are not available when we are just reading virtual key codes from a list to draw a table of key names, and so we have to convert our virtual key codes into scan codes with another Windows API function, mangle them into the format GetKeyNameText expects and pass those instead.
At this point, the astute among you may have spotted a problem. If virtual key codes are not unique to a specific key, and scan codes are, and we have to save the list of redefined controls as virtual key codes – making the compromise that a key such as ‘SHIFT’ will just have to mean ‘either SHIFT key’ for simplicity – then when we do the conversion from virtual key code to scan code in order to get the key’s name, how do we get the ‘right’ scan code and therefore display the ‘correct’ key name? For example, converting the up arrow (VK_UP) to a scan code and then retrieving its name will in fact yield ‘NUM 8‘ rather than ‘UP ARROW‘ by default as the key name text, which is probably not what we want. This problem is addressed below.
2. Creating a re-usable class to store user-defined controls
Data structures
The first task is to create a type to store an individual game control. This will basically be a struct which wraps the functional name that you want to give to the key, eg. “Change Weapon” or “Rotate Piece”, and the virtual key code that the action is mapped to.
struct GameControl
{
	string displayName;
	unsigned int keyCode;

	GameControl() : displayName(""), keyCode(0) {}
	GameControl(string name, unsigned int code) : displayName(name), keyCode(code) {}

private:
	// Serialization helpers
	friend class boost::serialization::access;

	template <typename Archive>
	void serialize(Archive &ar, const unsigned int version)
	{
		ar & displayName;
		ar & keyCode;
	}
};

BOOST_CLASS_TRACKING(GameControl, boost::serialization::track_never)
The serialization code using Boost.Serialization serves to describe how the contents of the struct will be saved to disk and works identically to as described in the high score table article, so I won’t go over it again here. Note that Boost.Serialization generates a compilation error if you attempt to use a non-const struct; to eliminate this we use the BOOST_CLASS_TRACKING macro to turn off object tracking, since we don’t need it anyway (see the Boost.Serialization documentation for more information on object tracking).
We then create a class to store all of the controls:
class GameControls
{
private:
        // File to store the controls in
	std::string keysFile;

protected:
        // Map of (game action ID -> GameControl)
	typedef boost::unordered_map<int, GameControl> KeyMapping;
	KeyMapping keyMap;

        // Change the virtual key assigned to an action
	void setKey(int keyIndex, int key);

        // Get the name of a virtual key code
	void getKeyName(int key, char *buf, int bufSize);

        // Save the controls to file
	void save();

        // Load the controls from file
	void load();

public:
	// NOTE: You should create an enum in the child with the names of all the keys used

        // Set up the default controls for this game
	virtual void SetDefaults() = 0;

        // Allow access to the key map using array syntax
	unsigned int operator[](int i) { return keyMap[i].keyCode; }

        // Constructors
	GameControls() {}
	GameControls(std::string path) : keysFile(path + "controls.dat") {}
};
Note that this is an abstract class which cant be instantiated directly – we are going to derive from it for the specific game we shall use it with (Tetris, in this case).
The full qualified pathname of the file we will store the list of controls in is stored in keysFile – to set this correctly, see the “Storage location” section of the high score table article. Container selection is always important and the list of controls itself is stored in a Boost unordered_map. This is basically the same as a regular C++ Standard Library map except that it isn’t automatically sorted. Notice that the map has a key which is an int; the possible values for this int will be defined by an enum in the class we derive from GameControls, with each enum value corresponding to one possible in-game action (for example, move left, move right).
Deriving GameControls for your game
So far we have a generic re-definable controls class which can be used by any game. All the generic editing functions like setting a key value, fetching its value or its name, saving and loading are defined above. When we specialize the class (derive from it) to a class to be used by one specific game, we will include things such as the user interface code and anything else that is unique to the individual game.
The simplest possible version of a game-specific class is shown below. It basically includes only the default controls and list of possible actions, and no interface or other code:
class TetrisControls : public GameControls
{
public:
	enum Keys { Left, Right, Down, FastDrop, Rotate, Shift, Pause };

public:
	virtual void SetDefaults();

	TetrisControls() {}
	TetrisControls(string path) : GameControls(path) { load(); }
};

...

void TetrisControls::SetDefaults()
{
	keyMap.clear();
	keyMap[Left] =		GameControl("Move Piece Left", VK_LEFT);
	keyMap[Right] =		GameControl("Move Piece Right", VK_RIGHT);
	keyMap[Down] =		GameControl("Move Piece Down", VK_DOWN);
	keyMap[FastDrop] =	GameControl("Fast Drop", VK_UP);
	keyMap[Rotate] =	GameControl("Rotate", VK_CONTROL);
	keyMap[Shift] =		GameControl("Shift / Hold Piece", VK_SHIFT);
	keyMap[Pause] =		GameControl("Pause Game", 'P');
}
We have defined a list of every possible in-game action the user can take in the Keys enumeration, and given each action a friendly name (for the user interface) and a default virtual key code in SetDefaults(). Pretty simple.
3. Implementing the user-defined controls class
To change the key assigned to an action:
void GameControls::setKey(int currentlyEditing, int key)
{
	int prevKey = keyMap[currentlyEditing].keyCode;

	keyMap[currentlyEditing].keyCode = key;

	for (auto i = keyMap.begin(); i != keyMap.end(); i++)
		if (i->second.keyCode == key && i->first != currentlyEditing)
			i->second.keyCode = prevKey;
}
Usage: gameKeys.setKey(TetrisControls::Rotate, VK_SHIFT); (if gameKeys is an instance of a class derived from GameControls)
The first part of the function merely replaces the current virtual key code for the specified action to the one supplied. The for loop checks to see if any other action already had that key assigned to it and, if so, to prevent unwanted behaviour, re-assigns it to use the key that was previously used by the action whose key we just re-defined. This guarantees there will be no clashes such that one key is assigned to more than one action at a time.
To retrieve the human-readable name of a key:
void GameControls::getKeyName(int key, char *text, int maxTextSize)
{
	// From: <a href="http://www.ffuts.org/blog/mapvirtualkey-getkeynametext-and-a-story-of-how-to/" target="_blank">http://www.ffuts.org/blog/mapvirtualkey-getkeynametext-and-a-story-of-how-to/</a>

	int scanCode = MapVirtualKey(key, MAPVK_VK_TO_VSC);

	switch (key)
	{
	case VK_LEFT: case VK_RIGHT: case VK_UP: case VK_DOWN:
	case VK_HOME: case VK_END: case VK_PRIOR: case VK_NEXT:
	case VK_INSERT: case VK_DELETE: case VK_DIVIDE: case VK_NUMLOCK:
		scanCode |= 0x100;
		break;
	}

	GetKeyNameText(scanCode << 16, text, maxTextSize);
}
I’d like to thank richardwb for blogging about this as it saved me a fair amount of hair-tearing and my hair is already falling out, so that’s good 🙂 Please see the link above for more information about the scan code / key name problem and how this solution works. The long and short of it though is that you pass in the virtual key code you want the human-readable name of in key, and the result is stored in text (with a maximum length of maxTextSize characters).
This function isn’t actually needed at all, it is provided purely so that people coding the user interfaces for editing the controls have a quick way of getting the name of the existing assigned key if they want to.
To save and load the key list to file:
// Save game controls
void GameControls::save()
{
	std::ofstream KeysFile(keysFile, std::ios::out);
	boost::archive::text_oarchive oa(KeysFile);

	for (auto i = keyMap.begin(); i != keyMap.end(); i++)
	{
		oa << i->first;
		oa << i->second;
	}

	KeysFile.close();
}

// Load game controls
void GameControls::load()
{
	// Make a default controls file if none exists
	DWORD attr = GetFileAttributes(keysFile.c_str());
	if (attr == INVALID_FILE_ATTRIBUTES)
	{
		SetDefaults();
		save();
	}

	std::ifstream KeysFile(keysFile);
	boost::archive::text_iarchive ia(KeysFile);

	keyMap.clear();
	KeyMapping::key_type k;
	KeyMapping::mapped_type v;

	while (!KeysFile.eof())
	{
		ia >> k;
		ia >> v;
		keyMap[k] = v;
	}

	KeysFile.close();
}
The technique here is exactly the same as that in the high score table article so I shan’t go into great depth here. Two things worth noting which differ from the high score code are that load() checks to see if the file exists first, and generates a default set of controls and saves them if not; also, when reading in the values from the serialization archive to be stored in the unordered map, note that we use the key_type and mapped_type traits to ensure that we instantiate temporary storage variables (k and v) of the correct type for the container being used.
4. Enabling your game to use the user-defined controls class
First of all we just need to add a declaration for our derived version of GameControls in our main game class, and instantiate it when the application starts up:
class SimpleTetris : public Simple2D
{
...
private:
    // Control mappings
    TetrisControls gameKeys;
...
};

...

// Constructor for main application
SimpleTetris::SimpleTetris() : ...
{
    ...
    // Set game controls
    gameKeys = TetrisControls(DataPath);
}
Recalling that DataPath is generated by Simple2D to contain the user’s roaming profile data path for the application, this will effectively cause the game controls to be loaded from file into gameKeys (GameControls::load() is called in the constructor of TetrisControls). If none exist, TetrisControls::SetDefaults() will be called to set the controls to their defaults, and the list of controls saved to file (if you aren’t using Simple2D, just substitute DataPath for your own directory path choice). Therefore, initialization is very simple.
Next we need to replace any hard-coded references to specific virtual key codes to use the mappings in gameKeys instead. This is pretty easy, just Find & Replace on VK_ in your code. In SimpleTetris the changes are all made in SimpleTetris::OnKeyDown as you would expect, and look like this:
bool SimpleTetris::OnKeyDown(int key, int rc, bool prev)
{
	// Space pressed in game over state returns to the menu
	if (gameState == GameOver && key == ' ' && !prev)
	{
		// Check if high score has been achieved
		if (highscores.HighScore(score))
			SetGameState(EnterName);
		else
			SetGameState(Menu);

		return true;
	}

	// Toggle pause
	if (gameState == Playing && key == gameKeys[TetrisControls::Pause] && !prev) // was "key == 'P'"
	{
		SetGameState(Pause);
		return true;
	}
	else if (gameState == Pause && key == gameKeys[TetrisControls::Pause] && !prev)
	{
		SetGameState(Playing);
		return true;
	}

	// Only process keypresses if the game is in progress
	if (gameState != Playing)
		return false;

	if (currentShape.Active)
	{
		if (key == gameKeys[TetrisControls::Left])  // was 'key == VK_LEFT'
			currentShape.MoveLeft();

		if (key == gameKeys[TetrisControls::Right])  // was 'key == VK_RIGHT' etc....
			currentShape.MoveRight();

		if (key == gameKeys[TetrisControls::Down])
			if (currentShape.MoveDown())
				placePiece();

		if (key == gameKeys[TetrisControls::FastDrop])
		{
			currentShape.MoveToBottom();
			placePiece();
		}

		if (key == gameKeys[TetrisControls::Rotate])
			currentShape.Rotate();

		if (key == gameKeys[TetrisControls::Shift] && !held)
			shiftShapes();

		return true;
	}
	return false;
}
Notice how the use of overloading the index operator ([]) and the enum in combination make for nice readable code.
Note also that key == ' ' is still hard-wired to expect the user to press the space bar when the game has ended. This is fine, we don’t necessarily want to allow every key to be re-definable, and in this case, we always want the user to press space to continue when the game ends so there is no need to make it re-definable.
5. Creating a graphical user interface to re-define the game controls
At this point, two of the three issues listed at the start of the article have been tackled, and they can be dealt with in a fairly generic re-usable way as shown. Once again – and as with the high score table code – creating the user interface to let the user edit controls is the most complex and awkward of the problems, and there is no generic solution as it highly depends what game/rendering engine you are using. I will illustrate below how to produce a working user interface if you are using my Simple2D library and how it hooks into the methods provided by GameControls. If you are using another rendering library you will need to make significant changes, but hopefully still see the principle.

1. SimpleTetris main menu
Adding a Redefine Controls button to the main menu
The previous version of SimpleTetris had a single Play button on the main menu. We will ditch that code (from the SimpleTetris main constructor) and replace it with a ButtonGroup. This is a class defined by Simple2D which handles creating, rendering and dispatching mouse click and hover events on a row or column of buttons of similar appearance. This convenience class makes the entire process of creating a user interface much easier.
First we’ll add a new game state, EditControls:
class SimpleTetris : public Simple2D
{
public:
    ....
    // Possible game states
    enum GameStates { Menu, Playing, GameOver, Pause, EnterName, EditControls };
We’re going to use Boost.Bind – a library which allows parameters to be bound to function arguments before they are called – to create function references that will be called when the Play or Redefine Controls buttons are clicked with the mouse, so first include the relevant header file:
#include <boost/bind.hpp>
Then, create the menu and its actions in the game’s constructor:
// Set colour for menu buttons
ButtonColour = MakeBrush(Colour::BlueViolet, Colour::DarkBlue);

// Set menu button region for mouse input
int ButtonSizeX = 200;
int ButtonSizeY = 50;

ButtonTemplate menuOptions[] = {
// Start new game
	{ "Play", boost::bind(&SimpleTetris::newGame, this) },

// Redefine the controls
	{ "Redefine Controls", boost::bind(&SimpleTetris::SetGameState, this, EditControls) }
};

// Create main menu
MainMenu = ButtonGroup(this);
MainMenu.AddItemColumn(
	(ResolutionX - ButtonSizeX) / 2, (ResolutionY - ButtonSizeY) / 2 + 130,
	ButtonGroupTemplate(
		ButtonSizeX, ButtonSizeY, 10, 20,
		MakeBrush(Colour::DarkBlue), ButtonColour,
		MakeTextFormat(L"Verdana", 14.0f), MakeBrush(Colour::Yellow)),
		menuOptions, 2, 5);
This effectively generates the menu shown in Figure 1. First we set the menu button colour to a graduated fill, then the size of each button. Next, we create the list of options with button captions and the corresponding functions they call in the game code. Clicking Play begins a new game, while clicking Redefine Controls sets the game state to EditControls. The arguments to AddItemColumn merely set the position and remaining aspects of the appearance of each button.
Note that no actual interface processing code is required. Simple2D monitors the menu as long as it is switched on, and dispatches any mouse click events as appropriate. The rendering is also done automatically.
Switching between menus
The switching on and off of menus (the main menu, and the redefine controls screen) is done when the game state is changed as follows:
// Game state transition
void SimpleTetris::SetGameState(GameStates state)
{
	gameState = state;

	switch (gameState) {

	case Menu:
		gameKeys.Menu.Off();
		MainMenu.On();
		break;

	case EditControls:
		gameKeys.StartMenu();
		break;
...
}
Adding the redefine controls interface to the custom game controls class
We now extend TetrisControls – our specialized game controls class – with all the necessary interface code:
class TetrisControls : public GameControls
{
public:
	enum Keys { Left, Right, Down, FastDrop, Rotate, Shift, Pause };

private:
	Simple2D *renderer;
	typedef boost::unordered_map<int, Keys> ButtonMapping;
	ButtonMapping buttonIds;
	DrawingObject keyCapture;
	int currentlyEditing;

public:
	ButtonGroup Menu;

	void Init();
	void StartMenu();

	virtual void SetDefaults();

	TetrisControls() {}
	TetrisControls(string path, Simple2D *r) : renderer(r), GameControls(path) { load(); }
};
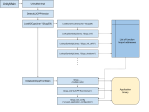
Refer to Figure 2 below. The buttonIds object maintains a mapping between the unique ID of each button on the user interface and which game action it is supposed to edit, so that when an edit is made via the interface, we can edit the correct key. keyCapture is a Simple2D object which defines an area of the screen to capture and dispatch keyboard events for. The idea is that when you click a button on the Redefine Controls screen, you can then choose a new key by pressing it, and keyCapture will grab that key press for us. currentlyEditing is the index of the key currently being edited.

Figure 2. The edit controls interface (the key names are shown in the user’s locale – Norwegian here)
The intended process is as follows:
- The menu is created with the names of the current keys assigned to each action.
- The user clicks one of the keys (in the right-hand menu column) to redefine it. This sets
currentlyEditingand enableskeyCapture. - The user presses a key on the keyboard to make the edit. This updates the key map, re-creates the menu, resets
currentlyEditingand disableskeyCapture.
If you are confused about the process flow, I would recommend you download the game and try it, as it will likely make much more sense then.
Accomplishing steps 2 and 3 is pretty simple. We add an initialization function which sets up key capture and makes the edits:
void TetrisControls::Init()
{
	keyCapture = DrawingObject(renderer,
			NULL,
			[this] (int key, int, bool) -> bool
			{
				setKey(currentlyEditing, key);
				StartMenu();
				return true;
			},
			NULL
			);
}
This creates a key capture covering the whole screen, which changes the key currently being edited to the pressed key and re-creates the menu whenever a key is pressed (if the object is enabled). The 1st and 3rd parameters here are functions called when a normal character (not special keys such as SHIFT or CTRL) is pressed and when a key is released – we’re not interested in those so we just set them to NULL. The 2nd parameter is a C++11 lambda function which does the main work.
The control setup in SimpleTetris’s constructor now becomes:
// Set game controls
gameKeys = TetrisControls(DataPath, this);
gameKeys.Init();
Creating the Redefine Controls display
Our final task is the mini-nightmare of generating the display and its behaviour. Let’s go through this piece by piece.
void TetrisControls::StartMenu()
{
	int BSizeX = 200, BSizeX2 = 140;
	int BSizeY = 30;
	int BGapX = 10;
	int StartX = (renderer->ResolutionX - (BSizeX + BSizeX2 + BGapX)) / 2;
	int StartY = 140;

	keyCapture.Off();
	Menu.Off();
We set the width of buttons in the first and second columns with BSizeX and BSizeX2 respectively. The height is set in BSizeY, the horizontal gap between each button in BGapX and the top-left position is calculated centerized based on the display resolution, then stored in StartX.
Finally, key capture and the main menu are both disabled.
	Menu = ButtonGroup(renderer, false);

	ButtonTemplate *menuOptions = new ButtonTemplate[keyMap.size()];

	int o = 0;
	for (auto i = keyMap.begin(); i != keyMap.end(); i++, o++)
	{
		menuOptions[o] = ButtonTemplate();
		menuOptions[o].text = i->second.displayName;
		menuOptions[o].onClick = [] (Button &) {};
	}

	Menu.AddItemColumn(StartX, StartY,
		ButtonGroupTemplate(BSizeX, BSizeY, 5, 10,
		renderer->MakeBrush(Colour::DarkBlue), renderer->MakeBrush(Colour::BlueViolet, Colour::DarkBlue),
		renderer->MakeTextFormat(L"Verdana", 14.0f), renderer->MakeBrush(Colour::White), false),
		menuOptions, keyMap.size(), 5);
Here we create the buttons for the left-hand column – with action names from keyMap[X]->second.displayName – and tell Simple2D to do nothing when they are clicked on with the lambda function [] (Button &) {}, which effectively turns them into non-interactive labels.
	o = 0;
	char keyText[256];

	for (auto i = keyMap.begin(); i != keyMap.end(); i++, o++)
	{
		getKeyName(i->second.keyCode, keyText, 256);

		menuOptions[o].text = keyText;
		menuOptions[o].onClick = [this] (Button &b)
		{
			for (auto i = buttonIds.begin(); i != buttonIds.end(); i++)
				Menu[i->first].SetActive(false);

			currentlyEditing = buttonIds[b.GetID()];
			b.SetText("Press New Key");
			b.SetBrush(renderer->MakeBrush(Colour::Green));
			keyCapture.On();
		};
	}
We now create the second column of buttons by fetching the human-readable name of each key currently assigned via i->second.keyCode. When one of the buttons is clicked, the lambda function first disables all of the buttons on the screen so that clicking has no further effect for now, sets currentlyEditing so that we know the index of the key to edit, changes the text to prompt he user to press a key, and turns key capture on.
	StartX += BSizeX + BGapX;
	BSizeX = BSizeX2;

	// Make buttons with key names and get a list of the button IDs
	vector<int> bIds = Menu.AddItemColumn(StartX, StartY,
		ButtonGroupTemplate(BSizeX, BSizeY, 5, 10,
		renderer->MakeBrush(Colour::DarkBlue), renderer->MakeBrush(Colour::BlueViolet, Colour::DarkBlue),
		renderer->MakeTextFormat(L"Verdana", 14.0f), renderer->MakeBrush(Colour::Yellow)),
		menuOptions, keyMap.size(), 5);

	// Store a mapping of button IDs to corresponding keys to redefine
	o = 0;
	for (auto i = bIds.begin(); i != bIds.end(); i++, o++)
		buttonIds[*i] = static_cast<Keys>(o);

	delete [] menuOptions;
We set the starting position of the 2nd column and add it to the interface, retrieving the button IDs as we go, and creating a mapping between them and the corresponding key they cause to be re-defined when clicked on.
	ButtonTemplate rowOptions[] = {
	// Default settings
		{ "Defaults", [this] (Button &) { SetDefaults(); StartMenu(); } },

	// Accept changes
		{ "OK", [this] (Button &) { keyCapture.Off(); save(); static_cast<SimpleTetris *>(renderer)->SetGameState(SimpleTetris::Menu); } },

	// Ignore changes
		{ "Cancel", [this] (Button &) { keyCapture.Off(); load(); static_cast<SimpleTetris *>(renderer)->SetGameState(SimpleTetris::Menu); } }
	};

	// Create bottom row of controls
	BSizeX = 100;
	BSizeY = 40;

	Menu.AddItemRow(
		(renderer->ResolutionX - (BSizeX + 5) * 3 + 5) / 2, (renderer->ResolutionY - BSizeY) - 20,
		ButtonGroupTemplate(
			BSizeX, BSizeY, 10, 20,
			renderer->MakeBrush(D2D1::ColorF(0.0f, 0.0f, 0.3f)), renderer->MakeBrush(Colour::BlueViolet, Colour::DarkBlue),
			renderer->MakeTextFormat(L"Verdana", 14.0f), renderer->MakeBrush(Colour::Yellow)),
			rowOptions, 3, 5);

	Menu.On();
}
Finally, we come to the creation and behaviour of the row of buttons at the bottom of the interface. The first one resets all the controls to the defaults and re-creates the menu (line 69); the second disables key capture, saves the changes and changes the game state so that we are returned to the main menu (line 72); the third disables key capture, discards any changes by re-loading the saved controls and changes the game state back to the main menu.
The remaining code adds the row of buttons to the interface, and finally, switches the menu on with Menu.On().
It’s pretty messy, but that’s the way we have to roll on this one…
The End
Do of course feel free to copy and paste the relevant parts of this article’s code into your own games, and do check out the full source code at the top of the page. While I have shown every line of code needed here, you will perhaps get a better idea of how it all fits together by looking at the program as a whole.
I hope you enjoyed the tutorial. Next time we are going to look at sprucing up SimpleTetris with some cool animations!
Katy would love it if you could help keep her stocked with cookies while she codes!


You must be logged in to post a comment.