Direct2D 1.1 Migration Guide for Windows 7 Developers
Update 18th February 2013: Added information about Visual Studio 2012, removed a redundant library reference from the old DirectX SDK and added the library reference needed for the Direct2D Effects Framework.
If you have developed applications targeting the original Direct2D (which we’ll call Direct2D 1.0) which comes bundled with Windows 7 and is also available on Windows Vista SP2 with Platform Update, there may come a time when you want to use features from the newer Direct2D 1.1 bundled with Windows 8. In particular, you may want to use the new Direct2D Effects API, the new multi-threaded application features or some of the new methods available in the updated bitmap or geometry interfaces.
Run-time dependencies
Windows 7 users must be running Service Pack 1 and have installed Platform Update for Windows 7, which updates Direct2D, DirectWrite and Direct3D to the latest versions of DirectX 11.1, as well as WIC (Windows Imaging Component, which you may be using to load bitmaps into your Direct2D applications for example) and WARP (Windows Advanced Rasterization Platform, a software rasterizer).
Be warned that Direct2D 1.1 cannot be used in Windows Vista. If you update your applications to use the latest version, the minimum OS requirement becomes Windows 7 Service Pack 1 with Platform Update for Windows 7.
Compile-time dependencies
If using Visual Studio 2010, you’ll need to install the Windows 8 SDK to compile Direct2D 1.1 applications. This includes the Direct2D headers and libraries and installs without problems on Windows 7. If you are using Visual Studio 2012, the Windows 8 SDK is already installed for you and you don’t need to download it.
Setting up Visual Studio 2010
You will need to change the default include directories to look in the Windows 8 SDK folder instead of the Windows 7 SDK folder, unfortunately there is no obvious way to change the built-in defaults, and since Microsoft’s instructions at Using the Windows SDK for Windows 8 with Visual Studio 2010 are somewhat incorrect, here is what to do:
- Open any project
- Click the Properties Manager tab in the Solution Explorer sidebar
- Expand any branch until you find Microsoft.Cpp.Win32.user
- Right-click on this and choose Properties
- Click VC++ Directories
- Add the following to the start of Executable Directories: C:\Program Files (x86)\Windows Kits\8.0\bin\x86;
- Add the following to the start of Include Directories: C:\Program Files (x86)\Windows Kits\8.0\include\WinRT;C:\Program Files (x86)\Windows Kits\8.0\include\um;C:\Program Files (x86)\Windows Kits\8.0\Include\shared;
- Add the following to the start of Library Directories: C:\Program Files (x86)\Windows Kits\8.0\Lib\win8\um\x86;
- Click OK
This will set every project to use the Windows 8 SDK in preference to the Windows 7 SDK.
Warning: if you are compiling from the command-line, note that the INCLUDE environment variable does not reflect these changes, and $(WindowsSdkDir) will still be set to the Windows 7 SDK path. This doesn’t matter if you use the IDE to do your compiles.
Setting up Visual Studio 2012
The Windows 8 SDK comes pre-installed with Visual Studio 2012 with all the default include and library paths correctly set, so you don’t need to do anything.
Updating your linker inputs
You don’t need to change your linker input – d2d1.lib still contains everything, although if you weren’t using it before you will need to add d3d11.lib due to the new integration with Direct3D (see below). If you want to use the Direct2D Effects Framework, you must add a reference to dxguid.lib to your linker input.
Updating your #includes
These includes:
#include <d2d1.h>
#include <d2d1_helper.h>
should be replaced with:
#include <d2d1_1.h>
#include <d2d1_1helper.h>
You must also add:
#include <d3d11_1.h>
If you want to use the effects framework, add:
#include <d2d1effects.h>
#include <d2d1effecthelpers.h>
If you were also using DirectWrite, change:
#include <dwrite.h>
to:
#include <dwrite_1.h>
At this point I recommend re-compiling your existing application and make sure that it works as you expect. The new headers are backwards-compatible with the old ones so if everything is installed and configured correctly your existing code should compile and run just fine. Be sure to go to your project properties and in Configuration Properties -> Linker -> General, change Show Progress to /VERBOSE:Lib and then watch the build output when you compile your application to make sure that it links to the library files in the Windows 8 SDK folder.
Note that even though your application will run, the new Direct2D features are not available yet, as Direct2D must be initialized in a new way to access them. Keep reading.
Re-doing the intsafe fudge (Visual Studio 2010 only)
When compiling Direct2D 1.0 applications in Visual Studio 2010, you may have encountered macro re-definition warnings (C4005) because some of the same macros are defined in both stdint.h and intsafe.h. Furthermore you may have worked around it like this:
#define _INTSAFE_H_INCLUDED_
#include <stdint.h>
That won’t work anymore since Direct2D 1.1 requires macros in intsafe.h which aren’t defined in stdint.h. Instead, use:
#pragma warning(push)
#pragma warning(disable: 4005)
#include <intsafe.h>
#pragma warning(pop)
Boost users (Visual Studio 2010 only)
If you use Boost you’re going to have the same problem as above every time you include a Boost header. Wrap your Boost header includes in the three pragma directives above to compile without encountering these warnings.
They Love To Overcomplicate Everything
One of my original complaints about Direct2D was that it was rather convoluted and over-complicated. Well, good news, Microsoft have listened to my feedback; then completely ignored it and made Direct2D 1.1 even more complex than the original.
Not only is the initialization procedure obscenely complicated for an ‘easy-to-use’ 2D interface, but for those of us (and I believe it is the vast majority of us) who are targeting for desktop apps and really don’t care about Metro apps or Windows Store apps, the new sample framework and examples provided with Direct2D 1.1 are going to leave you scratching your head wondering how on Earth to access what’s new in your existing applications without completely re-writing them.
A paragraph you can safely ignore if it means nothing to you: The new Direct2D sample framework uses the so-called C++/CX syntax introduced in Visual C++/Studio 2012 which is supposed to make using the new WinRT libraries and Agile window platform easier to use. I got you there didn’t I? Don’t feel bad if you don’t know what any of that is, I didn’t either. WinRT is a new set of APIs which is supposed to mitigate the need to use Win32 directly (think MFC, only usable), and Agile is a set of APIs for handling windows in Windows 8, especially for Metro apps.
In short, the Direct2D sample framework manages COM interfaces/pointers completely differently, and has no Windows message pump or window handles (HWND variables) at all. Back in the real world, most of us have working Direct2D codebases which already deal with the Windows message pump and already memory manage our COM handles properly, so we need to throw their framework out of the window and find out how to update our existing code to use the new Direct2D features with the minimum number of changes possible.
In addition, the documentation as it stands now is a mess of mixed information some of which refers to the original Direct2D workflow and some of which refers to the new workflow, so some of the code examples don’t work anymore, and some of the new ones only work if you are using WinRT and Agile, which we’re not.
ComPtr and how to code the Direct2D documentation examples without it
Among the usual includes in the header files of the sample framework, you’ll find a mysterious reference to wrl.h which stands for Windows Runtime Library (WinRT). This provides only one item of interest for Direct2D developers, namely the new ComPtr class which is a smart pointer class that saves you having to call Release() on COM objects when you’re finished with them. ComPtr holds a pointer to a COM object whose reference count is automatically decremented and the object released when the ComPtr instance goes out of scope. Note it is not the same as CComPtr which is found in atlbase.h.
If you haven’t started writing your Direct2D application yet, I recommend you use ComPtr as it can save you from some pretty nasty memory management gotchas. For those of you with established working codebases, adding ComPtr to your code will require significant changes, so for clarity I will now show some sample code from the MSDN documentation, and an equivalent version with does not use ComPtr:
Sample framework code to create a black paintbrush:
ComPtr<ID2D1SolidColorBrush> pBlackBrush;
DX::ThrowIfFailed(m_d2dContext->CreateSolidColorBrush(D2D1::ColorF(D2D1::ColorF::Black), &pBlackBrush);
// some rendering code
// end of function (pBlackBrush goes out of scope)
Equivalent code without ComPtr:
ID2D1SolidColorBrush *pBlackBrush;

if (FAILED(m_d2dContext->CreateSolidColorBrush(D2D1::ColorF(D2D1::ColorF::Black), &pBlackBrush))
  throw;

// some rendering code
pBlackBrush->Release();
ComPtr also provides a couple of methods you should know about. The first is Get() which retrieves the underlying pointer to the COM interface, so in the sample framework code:
pBlackBrush.Get()
is equivalent in our standard code to:
pBlackBrush
(although you’ll note that because the documentation is screwed up, they forgot to actually add .Get() in the brush rendering example in Direct2D Quickstart for Windows 8, and a kind reader pointed it out to them)
The other method of interest is ComPtr::As. The legendarily detailed documentation describes the purpose of this function as Returns a ComPtr object that represents the interface identified by the template parameter. It turns out that what it actually does is traverse the COM tree to find the selected underlying interface of the object. For example, in Direct3D 11.1, an ID3D11Device1 derives from IDXGIDevice. In the sample framework, one is obtained from the other like this:
ComPtr<ID3D11Device> m_d3dDevice;
ComPtr<IDXGIDevice> dxgiDevice;
...
// setup m_d3dDevice
...
// get IDXGIDevice
m_d3dDevice.As(&dxgiDevice);
...
In our code, we can re-write this as follows:
ID3D11Device *m_d3dDevice;
IDXGIDevice *dxgiDevice;
...
// setup m_d3dDevice
...
// get IDXGIDevice
m_d3dDevice->QueryInterface(__uuidof(DXGIDevice), (void **)&dxgiDevice);
...
Window handling
Windows in the Direct2D 1.1 sample framework are dealt with by the Agile library and there is a reference to include agile.h in the framework header code. Agile is only supported on Windows 8, and not interesting for standard desktop apps anyway, so you can just omit this header and ignore it.
The first problem comes when creating the swap chain (see below), suffice to say the sample framework uses:
swapChainDesc.Scaling = DXGI_SCALING_NONE;
swapChainDesc.SwapEffect = DXGI_SWAP_EFFECT_FLIP_SEQUENTIAL;
Without getting into to much detail, DXGI_SCALING_NONE (how to scale the window contents when it is resized) is not supported on Windows 7, and DXGI_SWAP_FLIP_SEQUENTIAL (how to flip the back buffers) is only to be used for Metro apps. For code targeting Windows 7, use:
swapChainDesc.Scaling = DXGI_SCALING_STRETCH;
swapChainDesc.SwapEffect = DXGI_SWAP_EFFECT_DISCARD;
The sample framework uses CreateSwapChainForCoreWindow() to create the swap chain, and also suggests using CreateSwapChainForComposition() for targeting XAML applications. Neither of these are supported in Windows 7, and you must instead target a window handle (HWND) by using the only swap chain creation function not mentioned in the quickstart guide, CreateSwapChainForHwnd(). More on this below.
Don’t worry if all this swap chain business went over your head, I’ll explain in more detail below.
Regarding your Windows message pump, this can essentially stay the same as it was before with the same processing, and the sample framework code can be ignored.
Initializing Direct2D to enable new functionality

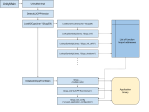
Figure 1. Initialization flow under the original Direct2D (left) and Direct2D 1.1 (right). The steps shown in light orange create temporary variables which you can discard after initialization is complete. ID2D1DeviceContext replaces ID2D1RenderTarget.
Figure 1 shows the scale of the unnecessary over-complexity introduced into Direct2D 1.1’s initialization procedure. What on Earth is going on here? Well, if you don’t care it doesn’t really matter since you can just cut and paste the code below and everything will just work, but in short, the new version of Direct2D requires you to render to a Direct3D surface instead of its own render target (hence the need for the d3d11_1.h header). In order to do this, we have to:
- initialize Direct3D
- set the Direct3D render target to our application window
- fetch the back buffer (off-screen rendering area) Direct3D is using to render to our window
- set this as Direct2D’s render target
Since Direct3D surfaces cannot be used directly by Direct2D, we have to employ an interoperability layer called DXGI to provide the Direct3D back buffer to Direct2D in a way it can use, adding further complexity. Additionally, where we used to just use the Direct2D factory to get a window-targeting render target directly, we now have to create a Direct2D device from the factory, create a Direct2D device context from the Direct2D device, then assign a bitmap to it as the render target. Quite pointless.
Direct2D render targets
Classes derived from ID2D1RenderTarget such as ID2D1HwndRenderTarget are no longer used. Instead, we always use the new class ID2D1DeviceContext (which also derives from ID2D1RenderTarget). ID2D1DeviceContext provides all of the rendering functionality we had before, along with new methods such as DrawImage and CreateEffect. See the ID2D1DeviceContext reference for more details.
If you simply change the type of your render target object in your application from ID2D1HwndRenderTarget to ID2D1DeviceContext instead, the new functionality will be available once the initialization steps are completed with no further modifications to your code.
The Code
In your main class definition (or global variables section):
- change the Direct2D factory type from
ID2D1FactorytoID2D1Factory1 - if you are using DirectWrite, change the DirectWrite factory type from
IDWriteFactorytoIDwriteFactory1 - if you are using WIC, change the WIC factory type from
IWICImagingFactorytoIWICImagingFactory2 - change your render target type from
ID2D1HwndRenderTarget(or other derived class) toID2D1DeviceContext - add 5 more definitions as follows:
// Direct3D device
ID3D11Device1 *Direct3DDevice;

// Direct3D device context
ID3D11DeviceContext1 *Direct3DContext;

// Direct2D device
ID2D1Device *Direct2DDevice;

// DXGI swap chain
IDXGISwapChain1 *DXGISwapChain;

// Direct2D target rendering bitmap
// (linked to DXGI back buffer which is linked to Direct3D pipeline)
ID2D1Bitmap1 *Direct2DBackBuffer;
For completeness, these are the other variable names I used:
// Direct2D factory access
ID2D1Factory1 *Direct2D;

// DirectWrite factory access
IDWriteFactory1 *TextFactory;

// Windows Imaging Component factory access
IWICImagingFactory2 *ImageFactory;

// The render target device context
ID2D1DeviceContext *Screen;
Device-independent resources section
Creating a Direct2D factory now requires options, so if your old code looked like this:
hr = D2D1CreateFactory(D2D1_FACTORY_TYPE_SINGLE_THREADED, &Direct2D);
it should now look like:
D2D1_FACTORY_OPTIONS options;
ZeroMemory(&options, sizeof(D2D1_FACTORY_OPTIONS));

hr = D2D1CreateFactory(D2D1_FACTORY_TYPE_SINGLE_THREADED, __uuidof(ID2D1Factory1), &options, reinterpret_cast<void **>(&Direct2D));
The cast is needed with the new factory function to avoid a compiler warning.
Creating a DirectWrite and WIC factory if you need them remains unchanged:
// DirectWrite factory
hr = DWriteCreateFactory(DWRITE_FACTORY_TYPE_SHARED, __uuidof(TextFactory), reinterpret_cast<IUnknown **>(&TextFactory));

// Windows Imaging Component factory
hr = CoCreateInstance(CLSID_WICImagingFactory, nullptr, CLSCTX_INPROC_SERVER, IID_PPV_ARGS(&ImageFactory));
Device-dependent resources section
Previously you just used ID2D1Factory::CreateHwndRenderTarget() here to create your render target and not much else. It might have looked something like this:
// Retrieve size of client area and create a Direct2D render target of the same size that renders to the window's HWND.

RECT rc;
GetClientRect(m_hwnd, &rc);

D2D1_SIZE_U size = D2D1::SizeU(rc.right - rc.left, rc.bottom - rc.top);

hr = Direct2D->CreateHwndRenderTarget(
	D2D1::RenderTargetProperties(),
	D2D1::HwndRenderTargetProperties(m_hwnd, size),
	&Screen);
Throw that code away and hold onto your hats, here we go!
1. Set the Direct3D feature levels supported by our application:
// Set feature levels supported by our application
D3D_FEATURE_LEVEL featureLevels[] =
{
	D3D_FEATURE_LEVEL_11_1,
	D3D_FEATURE_LEVEL_11_0,
	D3D_FEATURE_LEVEL_10_1,
	D3D_FEATURE_LEVEL_10_0,
	D3D_FEATURE_LEVEL_9_3,
	D3D_FEATURE_LEVEL_9_2,
	D3D_FEATURE_LEVEL_9_1
};
Edit this list to contain the versions of Direct3D your application supports.
2. Create the Direct3D device and device context, making sure we set all flags correctly:
// This flag adds support for surfaces with a different color channel ordering
// than the API default. It is required for compatibility with Direct2D.
UINT creationFlags = D3D11_CREATE_DEVICE_BGRA_SUPPORT;

// Create Direct3D device and context
ID3D11Device *device;
ID3D11DeviceContext *context;
D3D_FEATURE_LEVEL returnedFeatureLevel;

D3D11CreateDevice(nullptr, D3D_DRIVER_TYPE_HARDWARE, 0, creationFlags, featureLevels, ARRAYSIZE(featureLevels), D3D11_SDK_VERSION,
					&device, &returnedFeatureLevel, &context);
This specifies to use the default graphics card (1st argument), hardware acceleration (2nd), no software rasterizer (3rd), supported feature levels (4th and 5th), current SDK version (6th) and returns the device, available feature level of the adapter and context in arguments 7-9.
3. Fetch the underlying interfaces and store them:
device->QueryInterface(__uuidof(ID3D11Device1), (void **)&Direct3DDevice);
context->QueryInterface(__uuidof(ID3D11DeviceContext1), (void **)&Direct3DContext);
4. Get the underlying DXGI device of the Direct3D device (we’ll need this temporarily to set up interoperability with Direct2D, see above):
IDXGIDevice *dxgiDevice;

Direct3DDevice->QueryInterface(__uuidof(IDXGIDevice), (void **)&dxgiDevice);
5. Create the Direct2D device from the DXGI device:
Direct2D->CreateDevice(dxgiDevice, &Direct2DDevice);
6. Create the Direct2D device context (to be used as the rendering interface later) from the Direct2D device:
Direct2DDevice->CreateDeviceContext(D2D1_DEVICE_CONTEXT_OPTIONS_NONE, &Screen);
Window-size-dependent resources section
At this point you can make a choice. If you care about what happens when your application window is re-sized, you will need to re-run this code on every WM_SIZE event from your Windows message pump. By ‘care’, I mean, if you want the render target surface to be re-sized to match your application window size. In your current Direct2D applications, when the window is re-sized you may be re-sizing the render target with ID2D1HwndRenderTarget::Resize(). This no longer works in Direct2D 1.1 and should be removed. Using the code below, when the window is re-sized the render target surface will automatically be stretched when rendered onto the window to exactly fill the window’s new size (but the size of the render target surface itself will not be changed – only its visual representation). If you instead want to have the render target re-sized when the window is re-sized as in the old behaviour, you will need to run the code below each time the window is re-sized. Otherwise you can simply paste this code right after the end of the device-dependent resources code above and ignore WM_SIZE events.
Earlier I mentioned swap chains. A swap chain basically describes a list of render target-sized buffers used for off-screen rendering and in what order to display them on the screen. Direct3D programmers will be familiar with swap chains already, but for those of you only using Direct2D this may come as news. In the original Direct2D, creating the swap chain was done for you but we now have to do it ourselves.
7. The first step is to get a DXGI factory object (which lets us create a swap chain) for the default graphics adapter:
// Get the GPU we are using
IDXGIAdapter *dxgiAdapter;
dxgiDevice->GetAdapter(&dxgiAdapter);

// Get the DXGI factory instance
IDXGIFactory2 *dxgiFactory;
dxgiAdapter->GetParent(IID_PPV_ARGS(&dxgiFactory));
8. Then we describe the swap chain:
// Describe Windows 7-compatible Windowed swap chain
DXGI_SWAP_CHAIN_DESC1 swapChainDesc = { 0 };

swapChainDesc.Width = 0;
swapChainDesc.Height = 0;
swapChainDesc.Format = DXGI_FORMAT_B8G8R8A8_UNORM;
swapChainDesc.Stereo = false;
swapChainDesc.SampleDesc.Count = 1;
swapChainDesc.SampleDesc.Quality = 0;
swapChainDesc.BufferUsage = DXGI_USAGE_RENDER_TARGET_OUTPUT;
swapChainDesc.BufferCount = 2;
swapChainDesc.Scaling = DXGI_SCALING_STRETCH;
swapChainDesc.SwapEffect = DXGI_SWAP_EFFECT_DISCARD;
swapChainDesc.Flags = 0;
See earlier in the article for notes about creating a swap chain that works with Windows 7 desktop apps.
Width and Height are set to zero which means they will be automatically determined from the application window’s client size. The pixel format must be as shown for compatibility with Direct2D. SampleDesc defines multi-sampling parameters (an anti-aliasing technique); setting the values to 1 and 0 effectively disables it. BufferUsage specifies that this swap chain will be a render target and BufferCount specifies two buffers – one on the screen and one off-screen for the next frame. The Scaling and SwapEffect flags were discussed earlier.
9. Create the swap chain and target it at the application window:
// Create DXGI swap chain targeting a window handle (the only Windows 7-compatible option)
dxgiFactory->CreateSwapChainForHwnd(Direct3DDevice, m_hwnd, &swapChainDesc, nullptr, nullptr, &DXGISwapChain);
where m_hwnd is your application main window’s HWND handle. The 4th argument allows you to optionally specify a full-screen swap chain, and the 5th allows you to restrict which monitors the render target surface is displayed on (presumably for DRM purposes). You can generally just ignore the last of these, although some of you will need to make full-screen swap chains.
10. We now need to get the swap chain’s back buffer (the off-screen rendering buffer) in a format that we can link to Direct2D to make it the render target. This format is an IDXGISurface:
// Get the back buffer as an IDXGISurface (Direct2D doesn't accept an ID3D11Texture2D directly as a render target)
IDXGISurface *dxgiBackBuffer;
DXGISwapChain->GetBuffer(0, IID_PPV_ARGS(&dxgiBackBuffer));
11. We’ll create a bitmap with Direct2D which has the properties needed to be a render target, and link it to this back buffer:
// Get screen DPI
FLOAT dpiX, dpiY;
Direct2D->GetDesktopDpi(&dpiX, &dpiY);

// Create a Direct2D surface (bitmap) linked to the Direct3D texture back buffer via the DXGI back buffer
D2D1_BITMAP_PROPERTIES1 bitmapProperties =
	D2D1::BitmapProperties1(D2D1_BITMAP_OPTIONS_TARGET | D2D1_BITMAP_OPTIONS_CANNOT_DRAW,
	D2D1::PixelFormat(DXGI_FORMAT_B8G8R8A8_UNORM, D2D1_ALPHA_MODE_IGNORE), dpiX, dpiY);

Screen->CreateBitmapFromDxgiSurface(dxgiBackBuffer, &bitmapProperties, &Direct2DBackBuffer);
Note the bitmap properties and pixel format and DPI settings must be exactly as shown otherwise creation will fail.
12. Finally, set the bitmap as the Direct2D device context’s render target:
// Set surface as render target in Direct2D device context
Screen->SetTarget(Direct2DBackBuffer);
We now use the Direct2D device context to render as if we were using an old-style Direct2D render target. When the device context draws to the Direct2D bitmap, it actually draws to the DXGI surface, which is itself the back buffer of the Direct3D swap chain which targets our application window. Therefore, everything seamlessly functions the same as before.
13. Don’t forget to release all the temporary stuff from the device-dependent and window-size-dependent sections before the functions close:
SafeRelease(&dxgiBackBuffer);
SafeRelease(&dxgiFactory);
SafeRelease(&dxgiAdapter);
SafeRelease(&dxgiDevice);
SafeRelease(&context);
SafeRelease(&device);
14. Similarly don’t forget to release the application lifetime COM objects in your discard device resources code:
// Direct2D 1.1
SafeRelease(&Direct2DBackBuffer);
SafeRelease(&DXGISwapChain);
SafeRelease(&Screen);			// Direct2D 1.0 also (this line only)
SafeRelease(&Direct2DDevice);
SafeRelease(&Direct3DContext);
SafeRelease(&Direct3DDevice);
Presenting the back buffer
In the original Direct2D, displaying the contents of the render target was done for you automatically. Because we are now using a swap chain manually, we need to manually do the buffer swap too. This is called presenting the back buffer. It’s pretty easy, just add this code after you call ID2D1DeviceContext::EndDraw():
// Present (new for Direct2D 1.1)
DXGI_PRESENT_PARAMETERS parameters = { 0 };
parameters.DirtyRectsCount = 0;
parameters.pDirtyRects = nullptr;
parameters.pScrollRect = nullptr;
parameters.pScrollOffset = nullptr;
hr = DXGISwapChain->Present1(1, 0, ¶meters);
You should not usually need to change the arguments to Present1 but you can find all the possible settings in the IDXGISwapChain1::Present1 reference on MSDN.
At this point, your work is done. All your existing applications should now compile and work as they were before (besides the window re-sizing behaviour noted above), and if you want to use new features of Direct2D you just have to call the relevant new methods on your ID2D1DeviceContext object. Congratulations, you survived the nightmare!
New classes ending in ‘1’
Note that there are new classes in Direct2D 1.1 which take the same names as the previous classes but with the number 1 added to the end of the class name. These are the updated versions of the classes with new methods and properties etc., and always derive from the original class so all the original functionality is available. You may wish to do a global find & replace in your project to replace the old class names for the new ones so the functionality becomes immediately available everywhere.
In particular, consider looking at ID2D1Bitmap1, ID2D1BitmapBrush1, ID2D1PathGeometry1 and ID2D1StrokeStyle1. New classes which weren’t present in the original Direct2D don’t have any numerical suffix, eg. ID2D1Effect.
Don’t forget…
…to wrap all this stuff in an endless amount of HRESULT checks with if (hr == S_OK), if (FAILED(...)) or however else you like. Always do this error checking as there are many possible points of failure and you don’t want to have random crashing behaviour on your end-users’ machines.
The End
I hope I’ve saved you some hair-tearing since what I’ve written in this article took me the better part of a day to figure out. There was no useful information on the net about most of these topics so I thought I had better blog it. Please leave feedback below!
Share your thoughts! Note: to post source code, enclose it in [code lang=...] [/code] tags. Valid values for 'lang' are cpp, csharp, xml, javascript, php etc. To post compiler errors or other text that is best read monospaced, use 'text' as the value for lang.
Katy would love it if you could help keep her stocked with cookies while she codes!


Thanks for great article. It helped me to port my Direct2D 1.0 application to Direct2D 1.1 with little effort. But I have a big performance problem: without changing anything else than what you described, now my application is 10 times slower at starting (There are 49 child windows showing a small jpg calling Direct2D function. How is it possible ? Is Direct2D 1.1 really slower (I’m using Windows 10).
I figured out how to avoid the crud you showed here! My thought: If I was implementing the backward-compatible ID2D1HwndRenderTarget, I’d just inherit/delegate from an underlying ID2D1DeviceContext. QueryInterface is your friend! I’ll pingback a WordPress blog post with the details once I write it up properly.
Thanks for the great article. Hope you’re still reading comments these many years later because I have a question for which the net has, so far, been of no help. I have built one of Kenny Kerr’s examples:
https://msdn.microsoft.com/en-us/magazine/dn198239.aspx.
Finally get it to work after puzzling through many of the issues you clarified in your excellent article. But now I find that the app simply ignores the alpha channel in whatever device context primitives I post to render target. Kind of ironic after all the boasting in the MS literature about the great, new, always alpha aware DirectX API. I have tried changing many setup options, all to no avail. Two partially transparent filled rectangles written over the top of one another simple show the most recently posted completing covering the other. Unless I set the alpha value in the fill color to 0, in which case, the rectangle is simply not displayed. Wondered if you have seen this behavior or have any ideas about where I might look for help with the problem. Thanks in advance for any help you can provide.
The function “createswapchainforhwnd”, is only to be used for main application window.? and what about the other child windows inside it.?
Also…is there any effective technique to manage resources in D2D. (ex. CreateBitmapFromWicBitmap and CreateSharedBitmap), which treats resources in different manner.
Thank you, thank you thank you!!! (cant say it enough times). If only the Microsoft folk could be as thoughtfully and thoroughly descriptive in their example code – adapting to “the new stuff” would become less painful than the proverbial root canal.
Many thanks for the information, has saved a lot of time. A few questions:
1. Can I run my application on Windows XP and detect at runtime (by trying to create a factory) that DirectX 11.1 is available, or will the application report missing DLLs and fail to start? Same goes for Windows 7 w/o the Platform Update.
2. Do I need a recompiled version to run on Windows 8? Something to do with some IIDs being defined differently based on the #defined _WIN32_WINNT
3. My application consists of Windows, I assume I can use a single ID2D1DeviceContext for all of these cost Windows messages are processed in a single thread. However, each window can perform animations in its own animation thread. These animation threads need access to all resources to draw the window. should there be a separate ID2D1DeviceContext created for each animation thread with shared bitmaps, or can I use the single ID2D1DeviceContext with locking? If I have 10 windows perfoming animations at the same time I can’t really use a single locked ID2D1DeviceContext for all of them, right? What about the deferred contexts and rendering to them to improve performance?
Many thanks, and waiting for the next Direct2D article 🙂
1. No, DirectX 11.0 is not supported on platforms below Windows Vista SP2 with Platform Update or Windows 7. DirectX 11.1 required Windows 7 with Platform Update or Windows 8.
2. I don’t know I’m afraid, I haven’t done any Windows 8 development with it.
3. I’m used to game coding so I don’t really know how it works with multiple windows, I assume you can lock the context and switch the render target view but it is probably woefully inefficient, it is probably less error-prone to spin up a device context for each window/thread.
Sorry for taking a month to reply…
Thank you very very much, could not get Direct2D 1.1 work under Windows 7, but now, after following your steps, it does! Thanks again!